Friday, September 30, 2011
Handmade Wire Jewelry Bracelet: INGRID viking knit, The story
Ever since i learned and began my journey into the world of wire jewelry,
one technique in particular amazes me.
It is called, the VIKING KNIT technique.
Now, this technique has its own traditional method
and it is something we can't just change. We can change how
we begin it but we cant change or skip the process
if we want to have the desired end result of a viking knit chain.
In Malaysia, i can't find the proper tools required
so i get a little bit creative. To do a viking knit chain,
you will need two important tools. First is the mandrel and second
is the drawplate. I found a loca shop that sells
round shape wood stick and as for the drawplate,
i shipped in from an overseas online website for USD15.
I am a practical and lazy crafter.
If there is a shortcut and simpler way, i am all for it.
So that is why this viking knit that i did is not
exactly 100% the traditional method.
It has been M-odified ....lol
I am planning a workshop for this soon and if you are interested,
do drop an email to me at whimsicalnquirky@gmail.com
or PM me thru my facebook page.
the first picture is the finished knitted wire piece.
The mandrel is already removed and left is a piece of
hard worked knitted wire mesh. You can't bend it or move it.
The initial finish is really hard.
You can see in the picture below, the drawplate.
This is where the magic begins. You see all the holes?
from the biggest diameter to the smallest?
well, to get the end result, you have to pull the hard
knitted mesh through each one of the holes beginning
from the largest to the smallest.
You need not go through all the holes though,
just the desired ones but it has to be in order from big to small.
You will know once you give it a try.
After going thru the holes on the drawplate, the once hardened knitted wire mesh has become more and more flexible. You can see in the picture, the piece has also lengthened a bit.
You can see here the knitted mesh has elongated and squished together to form something chain-like.
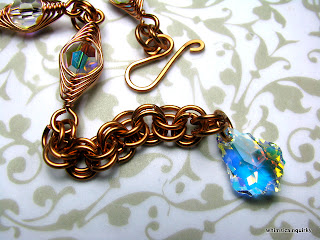
The bracelet still in bare copper finish.
I added a charm to give it a unique feature.
NOW...i am not done yet.
The reason i did this in bare copper is because i wanted to do oxidization.
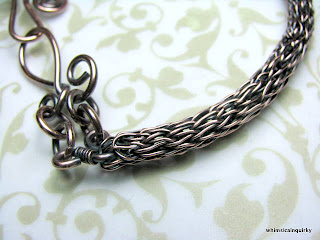
The picture below is the bracelet after i dipped in LOS solution.
It turned black!
The reason i do this is so that i can show a more detailed look to all the weaving and knitting. After dipping into the LOS solution,
i pat it dry and then gently polish the piece with fine steel wool,
a bit of brasso for shine and i am done!
Thursday, September 22, 2011
Handmade Wire Jewelry Bracelet : Swarovski Flower, sold
measures:
8 inches in length
material:
swarovski crystal
swarovski pearl
bare copper wire
price:
RM95
please add rm10 for shipping and handling
(NOTE: This bracelet will oxidize naturally over time. To remove oxidize matter, you can polish it with tamarind paste or lemon juice (natural option) or you can use brasso (chemical))
Handmade Wire Jewelry Pendant : Seed & Pearl, sold
measures approximate:
from top of bail to tip, 3.5 inches
diameter left to right, 2.9 inches
material:
japanese glass seed beads
fresh water pearls
bare copper wire
price:
RM75
NOTE: This bracelet will oxidize naturally over time. To remove oxidize matter, you can polish it with tamarind paste or lemon juice (natural option) or you can use brasso (chemical). Please use coton tips to avoid abrasion on the seed beads and fresh water pearls.
Friday, September 16, 2011
Handmade Wire Jewelry Earrings : Pearly Stud
MATERIALS:
BARE COPPER WIRE
SWAROVSKI PEARLS
PRICE:
RM40
(NOTE: This pair of earrings will oxidize naturally over time. To remove oxidize matter, you can polish it with tamarind paste or lemon juice (natural option) or you can use brasso (chemical). Please polish with cotton buds to avoid abrasion on the swarovski pearls.)
Handmade Wire Jewelry Earrings : Stud Wings
Handmade Wire Jewelry Bracelet : Copper Turquoise Amora, sold
Handmade Wire Jewelry Bracelet : Fuschia BONE
HANDmade Wire Jewelry Bracelet : Double Ring Copper Bone
Handmade Wire Jewelry Bracelet : Double Ring Brass Bone
Saturday, September 10, 2011
Handmade Wire Jewelry Necklace: ARGENTIUM AMORA
I have been wanting to make this necklace for so long and only now i have the time to do it! Therefore, I would like to share with you the process of making this classic piece.
I was torn at first about choosing the material to use. After much thought, a classic piece like this (that i will be putting in so much time and effort), the first piece should be made out of precious metal. Probably the second piece i will make it in bare copper.
This necklace is made out of
a mixture of Argentium Silver 930 parts and Sterling Silver 925 parts.
WHAT IS ARGENTIUM SILVER 930?
Argentium® Silver is a patented and trademarked alloy
that is at least 92.5% pure silver, just like traditional sterling.
What makes it different from traditional sterling silver is that
a small amount of germanium replaces some of the copper
that is usually the other 7.5% of sterling silver. Peter Johns,
a professor of silversmithing at Middlesex University in
England, invented Argentium® Silver in 1996.
It is highly tarnish-resistant.
Wires were meticulously measured and cut and each component weaved with love.
It took me about 2 nights of 4-5 hours each for making and construction and another third night for oxidizing and polishing (two steps). The first polish is to remove some of the blackened layer with steel wool to reveal a beautiful shade of gray. The second polish is the final tumbling process.
For most of the silver pieces i made, the process is the same. With the fast rising prices of precious metals, i wud say at least silver is still affordable and feel less intimidating to wear with regards to safety and fear of theft.
so how much will something like this cost?
Retail, intricate silver pieces like this can cost up to RM2000. Made it in Gold it will cost 10 times more.
Then again, it isnt the same piece.
This is is one unique piece.
The price for this necklace is RM950
but
the whole joyful experience of crafting this classic piece is priceless.
Yours Truly
:)
M
The finished piece after oxidization before polishing.
Component on the left is after first polishing process using steel wool.
The component on the right is after oxidization and before first polish.
Subscribe to:
Comments (Atom)


